Homesteading Projects, Tips + Tricks
My Tips for Processing Meat Birds
As an Amazon Associate I earn from qualifying purchases.
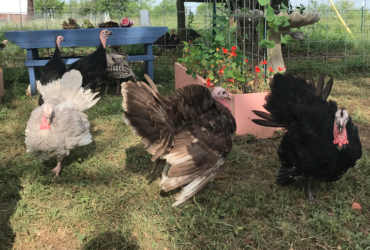
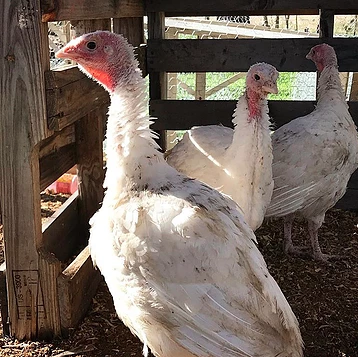
Monday I started processing some broad-breasted white turkeys we got from a friend whose kids raise them for 4-H (Thanks Jenna!). They had exploded in size the past week and I suddenly realized I needed to get them into the freezer sooner rather than later or else they wouldn’t fit in my equipment. Instead of waiting for the weekend when Dusty could help me, I decided to go ahead and do a few at a time on my own.
Last year was my first time processing. We helped cull the extra turkeys from last years’ 4-H project. None of us had done it before, but with the help of YouTube we tackled the challenge and had turkey in the freezer for months. We were all a little nervous but once we did a couple we realized it was actually a good experience for us all to have as meat-eaters. It’s so easy to walk into a supermarket and grab a package of nameless, faceless meat without understanding the gravity of the life we’ve taken to sustain us.
Common questions I get:
They’re your pets – how could you kill them?
Well yes and no, sometimes I harvest birds that are considered ‘pets’ (like an extra rooster who has turned nasty to the hens) and sometimes we harvest ‘meat birds’ that have that specific purpose. Taking the life of a ‘pet’ vs a ‘meat bird’ is no different. It’s somber either way and we try to make it as calm and quick as a process as it can be for the animal. Just because a meat bird has that specific purpose doesn’t mean they get any less care or respect as my birds I consider my pets. I guess I just have the mindset that everything on our property serves a purpose. Hens lay eggs, roosters fertilize the eggs and sometimes get sent to freezer camp if they’re naughty.
Does the meat taste different?
Yes, it tastes better! I find store bought chicken and turkey to have very little flavor. If you are eating a bird the same day you process it you may find the meat to be a little tough or gamey. If you cool the meat down after processing and then let it ‘age’ for a day or so in the fridge, the skin can tighten and dry. That will allow the flavor and texture to improve. If you’re processing bony roosters and older birds the meat can be stringy or tough, but the flavor is still there you just have to access it in different ways. Cooking an older bird down into a soup or for stock is a good way to make use of the meat. Or try bone broth if you’re trendy.
TIP #1: Get a book or watch Youtube videos

I won’t include all the *graphic* details in this blog because I wanted this post to educate and assist those thinking about harvesting poultry for the first time or for those curious about the process so I chose to make this a ‘G-rated post’ as to not gross anyone out or scare anyone away. I’m also not an expert on plucking and evisceration and there are so many awesome resources that would do a much better job if you’re really looking for step-by-step in depth information. For example, this book on Amazon is my processing bible. It talks about all the equipment you’ll need to get started as well as the steps from start to finish. From anatomy to butchering the final product.
I’m sure there are a ton of people out there who might make the leap into harvesting their own meat at some point, but are just a little squeamish and I understand that. Let me be the first to tell you it’s not the most pleasant experience obviously – there are new sights and smells you will encounter on your first meat bird adventure, but for me at least it wasn’t nearly as horrible and traumatizing as I thought it might be.
TIP #2- Withhold feed beginning the night before.
One of the things you might not think to do is withhold feed from your birds. This will ensure their crop is empty and their intestines aren’t a poop bomb waiting to explode on you when you eviscerate. You don’t want any droppings contaminating your meat!
TIP #3- Handle with care and respect.
A big perk of being able to process you own birds is eliminating the element of transportation which can often stress the birds and lead to a lower quality product in the end. Birds in crates can bruise themselves or break bones. Adrenaline from stress also uses up glycogen in the muscles which through biologic processes beyond my knowledge will lead to less lactic acid and lower quality meat.

Normally you will lower the bird, upside down, into a killing cone or some other type of restraining apparatus. You can purchase these pieces of equipment or get creative and make your own. I’ve seen some made from buckets or even traffic cones!
The cone restrains the birds wings from flapping and injuring itself but allows the head and neck to be exposed for exsanguination. Birds will become quite calm in this upside-down position. Speak softly and stay calm as the bird relaxes into this position.
You will also want very sharp knives. A knife set such as this browning set is very useful and will allow you to make a clean cut to the bird’s neck.

Top: vintage hunting knife, Bottom: Browning knife
A sharp knife is key for making a quick, clean cut. The only pain your bird should feel is this cut. Then it will begin to bleed out and lose consciousness and that will be that. Sometimes you might have to cut both sides of their neck or re-cut if it wasn’t a good slice. No worries- you will get better.
TIP #4- Be prepared for the flapping.
Something that could come as surprising to a first-time processor is the movements your birds will go through as they bleed out. As the bird gets close to death its nerves will start firing off and your bird will most likely flap or spasm a bit. Don’t worry, you haven’t done anything wrong and the animal is not in pain. It’s just how the body reacts to shutting down.
Sometimes it can seem pretty violent especially with a large turkey. When we processed last year and had multiple hands on deck, it was helpful for someone to make the cut and someone to hold on TIGHTLY to the legs so the bird didn’t flap its way out of the cone. Make sure your eyes or face aren’t in reach of any turkey talons. Once the bird ceases of any movements and the body goes limp its time to scald and pluck!
Tip #5- Do a soft scald.

If you don’t have a fancy scalder (I don’t) that regulates the temperature for you, it can be hard to keep track of how hot your water is getting. You don’t want your water so hot it will cook the bird. You will most likely have a propane burner and a large pot full of water near your processing station to dunk the birds in after they are dead. For me at least, it is easier to maintain a lower temperature aka a “soft-scald”. The ideal temperature for a soft-scald is 125-140*F.
Tip #6- Pluck firmly but gently (what?).
You might gain some finger muscles from plucking the large flight feathers and some of the other stubborn feathers on the bird. Plucking can definitely be frustrating at times. It seems like you clean an area perfectly, but when you look at that area again there are 10 small fuzzy feathers you missed.
It’s easy to start getting sick of this step and grabbing fistfuls of feathers and yanking them out, but that’s an easy way to start making tears in the skin. Work quickly, but don’t rush. The worst feeling is when you’ve done a beautiful job plucking, get impatient, and tear the skin on your otherwise perfect bird! (Believe me, I’ve done it)
It’s likely a few small feathers will remain. If you’re planning on roasting the bird whole these will singe off in the oven. If you don’t want any feathers you can use a butane torch to singe them off yourself.
Also, tricky pin feathers can be removed with needle nose pliers.
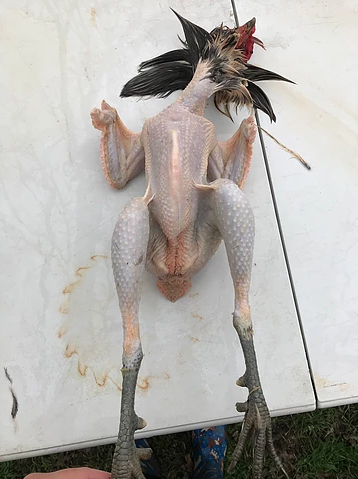
Tip #7- Try to get all the guts out in one go.
If you think about anatomy, everything is connected.

The best way to remove all the organs is to prep the carcass in such a way you can reach your hand in and remove all the organs in one pull. There will be less risk of something ripping open inside the bird if you do it this way. The butchering book I referenced above has great step by step photos of how to do this.
- -Cut open the neck and loosen the trachea, esophagus, and crop from the membranes.
- -Make a horizontal slice in the space between the vent and the breast where the skin is loose (this is where you will put your hand in to remove the guts).
- -Cut around the vent WITHOUT puncturing the lower intestines. Go slowly. You basically want to separate the ‘exit’ from the skin so you can pull it all out from the body cavity.
- -Slide your hand into the body cavity into the horizontal slice you made. You can gently loosen any parts that are sticking to the inside walls to make pulling everything out easier.
- – Pull out the contents and slide them into a trash can or whatever receptacle you’re using to collect the ‘inedibles’. If you want to keep the gizzard, liver, or heart you can pull these off and put them aside.
- -Scoop out the lungs (MY LEAST FAVORITE PART) Sidebar… I’m not squeamish in the slightest but my least favorite part of processing birds is scraping out the lungs. I’m not sure why. They are just as squishy and warm as all the other organs, but there is a component of also sponginess which I really don’t like. Blood? Fine. Mucus? Fine. Lungs? Eh. The lungs are tucked in between the ribs and you kind of just loosen them with your fingers then scoop them out. It’s kind of nasty.
- -Remove the head/neck. Remove the feet by cutting at the joint. Follow the path of least resistance.
- -Check the cavity for anything you missed. Lungs, gonads, etc. Then spray the inside of your carcass out with a hose. Make it nice and clean in there!
I watched a lot of videos on this step as it was probably the most foreign step of the process. But honestly its kind of hard to see what’s going on because all the organs are inside and the person in the video will most likely be describing the process while you can’t really see everything that’s going on. You will get better after doing a few birds and you will really start to understand how everything in put together in there!
Tip #8- Order shrink wrap bags!
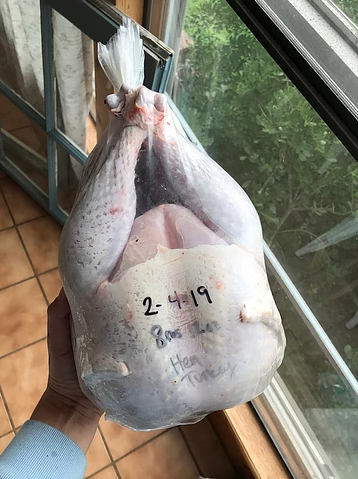
These are so great and they make storing whole birds a breeze. This isn’t even a sponsored ad but Texas Poultry Shrink Bags have great customer service and quality products. I highly recommend them!
Their largest size was just a TAD too small for my 12.5 lb tom. I ended up double bagging it which worked well until I lost grip on the bags in the water bath and I think the bag touched the bottom and melted. A DUH. My bad.
https://www.texaspoultryshrinkbags.com/
Alright, well, this post I think went on for 8000 years. Sorry if I rambled but hopefully there were some interesting tidbits in here for anyone who has processed before or is considering it on their homestead or maybe someone who is just curious.
Please feel free to leave your own tips below! The homesteading community is always so eager to help – I know there are so many people out there who are processing gurus so it would be awesome if we all learned from each other!
Until next time –
Olivia